Service Master Cleaner

Service Master Cleaner

Friday, 27 May 2016

How to Do an Emergency Water Damage Restoration

Water damage on property can happen from blocked drains, broken pipes, malfunctioning appliances, storms, sewage backups and flood waters. In every scenario, the nature of the damage will dictate the appropriate treatment. But whatever the cause of the water damage, the promise of restoration will depend largely on the speed with which the premises and personal property can be dried. Some emergency restoration services may be carried out by property owners themselves until professional help arrives.

Emergency Water Damage Restoration Tips


While most of the work will need to be done by professionals, here are some water damage restoration tips to follow while waiting for professionals to arrive at the scene.
  • Remember that water does not have to be contaminated to cause damage but that even clean water can generate mildew, mold and other bacterial growth if neglected. Therefore, it becomes very important to ventilate the wet areas as soon as possible. The safest way of doing this is to open all windows for maximum airflow. This will help remove some of the moisture and circulate air around the premises.
  • Shut off the electrical supply to the affected area to prevent the risk of electrical hazards such as getting electrocuted.
  • Carefully start removing standing water from flat surfaces by sponging, mopping or blotting. When doing so, it is absolutely crucial to wear protective covering especially if the water is contaminated. This includes rubber gloves, boots as well as face masks.Remove saturated rugs, carpets and other porous materials. In case of clean water, carpets may be saved when cleaned and disinfected professionally but will need to be discarded if water damage is from contaminated water.
  • Transport computers and portable devices to a dry environment. The faster these items get out of water’s way, the greater their chance of salvaging.
  • Likewise, clear away lamps, telephones and decorative items from wet furniture tops.
  • Open drawers and cabinet doors for interior drying without forcing to open any stuck surfaces.
  • A useful tip is to freeze important documents and books to retard mildew growth until proper drying can be performed.

Where water damage is caused by contaminated water, such as sewage or flood water, it is important to remember that this water contains bacteria and other microorganisms that are extremely dangerous to human health. Sewage and flood damage restoration demand additional precautionary measures such as keeping all children and pets out of the contaminated area while considering all water impacted surfaces as toxic until properly decontaminated.

Just as it is important to know what to do in a water damage emergency quickly, it is equally important to know what not to do in the same situation. These measures include the following:

  • Never operate any appliances or vacuums while standing on wet carpet or floors.
  • Do not use heat to dry closed building interiors since both mildew as well as expanded moisture damage may occur.
  • Avoid leaving wet fabrics in place and space them apart to prevent mold formation.
  • For water damage sustained from sewage or flood waters, try not to track any contaminated materials onto undamaged areas since that can spread the contamination.
  • Also, trying to decontaminate surfaces with over the counter sprays and other products may not work and not completely sterilize the affected surfaces.

Whenever a water emergency hits your home or other property, immediately get assistance from a professional water damage restoration company like ServiceMaster By Best in Wichita. We are a team of professionals who know that water damage restoration costs can add up quickly and offer our timely services to restore your property to its original condition.

Wednesday, 18 May 2016

What the heck is a Pack-Out?

couple leak ceiling
www.SMbyBest.com, a flood and fire cleanup provider with pack-out transfer storage services you can trust!

Everyday 14,000 people experience a water or fire emergency inside of their home or business. The emergencies are unexpected incidents stemming from faulty pipes inside of your walls, and a variety of other environmental issues. Emergencies that are fire related often times stem from poor electrical wiring or lack of responsibility when operating flames. With a number that staggering it is no mystery that you need help. All too often the disaster not only affects the property, but all of the contents that are inside of it. The contents can range from your comforters and blankets, to clothing purses and shoes.

In a nutshell, a pack-out is done when a customer experiences a household disaster such fire or water damage and they discover that damage carried over from the structure of the house to the items inside of their home. This is when a restoration company is called in to gather and box up the wet and damaged contents of the house. The overall goal is to prepare the contents for transport to the restoration company’s warehouse where it will be cleaned and deodorized while repairs are being made to the structure of the home.

The Pack-out, Transfer and Restoration process is performed by skilled and qualified restoration team members, who pay extra attention to the care of your belongings. Each one of your items are photographed, carefully boxed up and inventoried and transported to a climate controlled warehouse where they are sorted, washed, deodorized, sanitized, disinfected and dried. They are all re-inventoried then packed back up and stored in a climate controlled storage vault until the house is back to it’s habitable state. It is at this point that the restoration company will perform what is called a “pack-back” where all items are returned back to your home & unpacked.

Screen Shot 2015-08-05 at 8.34.12 PM

To assist you in choosing the right restoration company for you we have provided a list of 10 questions to ask when you are researching companies.

10 Questions to ask when choosing a Pack-out, Transfer and Restoration Company
  1. How long have you been in business?
  2. What is the number one service your company provides?
  3. How many jobs like ours have you done in the past year?
  4. Are you a local business?
  5. Does your company do all of the work or is it subcontracted?
  6. What kinds of cleaning methods do you use?
  7. What kind of training or certifications does your staff have?
  8. What is the turn around time for cleaning emergency items?
  9. Do you store my contents in a secure, climate controlled location?
  10. What kind of inventory system do you use for contents?

Thursday, 12 May 2016

5 Quick & Easy Ways to Sparkle Between Cleans!

Call  ServiceMaster for Cleaning and Restoration Services: (316) 243 9824

For anyone with young, male flatmates, you’ll understand my frustrations when I say that my home never sparkles long enough after my clean.

With such a hectic working life, helping busy Londoners (like myself) find their perfect regular cleaner, it’s difficult to find the time to keep the house looking it’s best between cleans.

So, how do you keep it sparkling in the shortest amount of time?

Here’s 5 ways you can keep it clean that won’t take longer than 5 or 10 minutes. You’re welcome…

1. Blow it Away


If you see dust starting to gather in your home, in hard to reach places – grab the hairdryer! If you gently blow away the dust, you’ll get that sparkling finish when you wipe over the area with a microfiber cloth! After dusting, a quick once over with the vacuum will ensure a clean, dust-free home between cleans!

2. Heat it up


Did you know that household sponges are a breeding ground for bacteria? Yep, that’s right – and you’ve been using them to wipe over surfaces in your home. A quick way to disinfect your sponges and cloths is to microwave on high for one minute. This way, you know that you’re not spreading germs around your home between cleans. Careful, don’t burn your fingers!

3. All you need is five


If you’re about to head out to a film or to dinner, and you have a little time to spare beforehand – use it. Set a timer for 5 minutes – there is no limit to the amount you can achieve. Reach for the lint roller and run it over furniture to remove pet hair, or take the time to fluff up the pillows on your sofa and fold the blanket that’s sprawled across the armchair.

4. Phone a friend


There are so many apps out there that have been built specifically to save you time when cleaning your home! In fact, we recently searched high and low to find the best home cleaning apps out there – for both iOS & Android. These apps have so many tips for helping you keep your home clean & organized.

5. Wipe it off


It’s a good idea to keep anti-bacterial cleaning wipes in the bathroom, bedroom & kitchen. This way, you keep rooms sanitized and germ free between cleaning visits, by giving areas that are at the highest risk of germs a wipe down. In the bathroom, a quick wipe down of the edge of the bathtub, toilet seat, toilet exterior and door handle will help keep it sparkling & germ free.

Friday, 6 May 2016

5 Smart Organizing and Quick-Cleaning Tips Inspired By ServiceMaster by Best


Want the efficiency of a tiny house clean without the tiny house? ServiceMaster by Best.

Tiny houses are popping up everywhere, not only as a solution to homelessness, but also for those seeking bigger living in exchange for a smaller carbon footprint (and income-to-debt ratio). While living in a home that is 400 square feet—or smaller—may not be for everyone, the organization and cleaning tips of such a lifestyle certainly can be.

Cleaning is easier when there is less to clean.


The best organizing tip and the fastest cleaning method are the same: if you have no clutter, things don’t get lost. When space is at a premium, only the vital are given real estate. Can you say that of your kitchen? Your closet? Your home office? Take the tiny home approach for just a moment. If you could only use 5 things for the next week, what would those things be?


Combine form and function.


When you don’t have the space to tuck things away, embrace them outwardly. This tiny home matches form and function quite literally, and it looks tidy and tied together at the same time. The use of a single color simplifies the aesthetic, minimizing visual clutter and almost pointing the way to where everything belongs. Tiny homes are masters at only containing the things that are actually used on a daily or weekly basis; there’s no need to be equipped for every occasion, only the life you live every day. And when they are also beautiful, there’s no need to hide them.


Find what you need.


The bulk of home organization tips are aimed at finding a place for everything you need. In a tiny home, the philosophy is flipped; first you figure out what you need, and then you find a place for it. Tiny home dwellers learn very quickly that the list of necessities is quite short, and they experience a sort of freedom that many of us, so bound by the need to be prepared for everything, never do. Take a nod from these minimalists and start to release yourself from the unworn clothing, one-use appliances, and (sometimes emotional) baggage and clutter that only take up space where something happy could be.


Don’t waste space. Or time.

This tiny home is one of the most popular on Houzz for a reason. It makes use of every square inch: drawers under beds, shelves on every wall, life in every corner. Yet, with all of that, it is still full of breadth and width and space. This is where the little house movement takes shape; the freedom to move and the space to create and the bareness to breathe are just as important as the books on the shelves and the pans on the walls. The takeaway is that you may never get rid of “stuff”, but you should not make it more important than your right to clear passage.


Make the most of what you have.

And sometimes, like you can see here in this gorgeous tiny home, the most of what you have is actually not even yours.


This have-less-live-more philosophy is one of the reasons why the tiny homes movement has such big picture appeal. No matter how big your house is these tips will help you make the most of your space and the time you have to enjoy it. If you lived in a tiny home, what five things would you definitely put in it?

Thursday, 28 April 2016

5 Easy Tips To Clean Your Windows

Clean Windows


 Call  ServiceMaster Clean for window cleaning: (316) 243 9824

Your windows are the part of your home which show just how much dirt and grime there is floating around in the outside world. These clear surfaces spend all day, 24-7, 365 days a year taking whatever mother nature has to throw at them and if you let the cleaning go to long, it’s amazing just how dirty and unpleasant looking a window can get.


Below are 5 easy tips for keeping your windows sparkling clean!

Use the right tools.
Most people’s window-cleaning arsenal consists of some windex, an old newspaper and maybe some paper towel. These materials, however, might not be your best option. Squeegees and microfibre cleaning cloths actually get the job done much better than the aforementioned products.

Squeegees.
Many people don’t realize just how effectively squeegees clean glass compared to paper towel and old newspapers. The suction that a squeegee creates means that you leave less liquid and grime behind and are able to cover more surface area with every stroke.

Rub around.
The main flaw with cleaning your windows with paper products is that as you rub the cleaning solution around, what you really inevitably end up doing is spreading more dirt around. If you insist on your paper to clean your windows, make sure you you are running through a fresh, clean surface with every pass you make. It can mean the difference between actually cleaning a window or redistributing dirt.

Get your technique down.
It might seem simple enough, but cleaning your windows without using the proper technique is not really cleaning them at all. Make sure whatever cleaning motion you decide to go with you keep consistent throughout the cleaning process. Starting horizontally and moving to vertical swipes and strokes is a great way to end up with streaky windows when it is all said and done.

Stick to a regular cleaning schedule.
The longer you leave your windows, the more dirt and grime builds up, the more the sun bakes it on and the harder it is to remove. If you keep to a set schedule for window cleaning, the task will be much easier every time you do it.

Cleaning the windows, like cleaning anything, is not very high on people’s lists of “fun things to do,” but it says a lot about your home and the people inside it. Your windows, because of their reflective nature, are one of the first and most glaring things that people notice about your home and even if the inside is a monument to cleanliness, dirty windows make it hard to believe. Follow the above 5 tips and keep your windows crystal clear all year long.

Thursday, 21 April 2016

The Best Way to Clean Hard Wood Floors

One of the top questions I receive is how to clean and care for hardwood surface floors.  It seems that everyone wants to know what the best method is, what won’t ruin their floors, and how to get the job done quickly and easily.  Because everyone loves a clean floor, right?

HARDWOOD FLOORS:

 
Before using any cleaner, make sure that your hardwood floors are sealed.  How to clean your wood floors is not always dependent on the kind of wood but rather the finish that is on them. If you aren’t sure what sort of finish is on your floors, check with the manufacturer.  I prefer to use a refillable or microfiber mop versus a steam mop on my hardwood floors. While many people love the ease of a steam mop, my personal preference is to play it safe and use a more gentle, and less moisture approach with the refillable mop.  Alternatively, a damp microfiber mop works – just use a spray floor cleaner and spray and wipe you go.
 
Favorite-Floor-Tools-via-Clean-Mama-1


UNFINISHED OR BAMBOO FLOORS:

 
If you have unfinished, waxed, or bamboo hardwood floors, the best approach is to use a barely damp (with water) microfiber mop pad.  Always check with your manufacturer’s instructions first.
 

STREAKS AND RESIDUE:


A couple helpful tips for streaks and residue on floors…if you are using a microfiber pad, dampen it before starting and rinse often while washing the floors.  If you have streaks with a steam mop and rinsing the mop head frequently doesn’t solve the problem, you might need to use distilled water (purchase by the gallon at your local grocery or drug store).  If you have hard water the minerals in your water may be contributing to streaking and residue on your floors due to the minerals in your water.

FAVORITE CLEANERS:

 
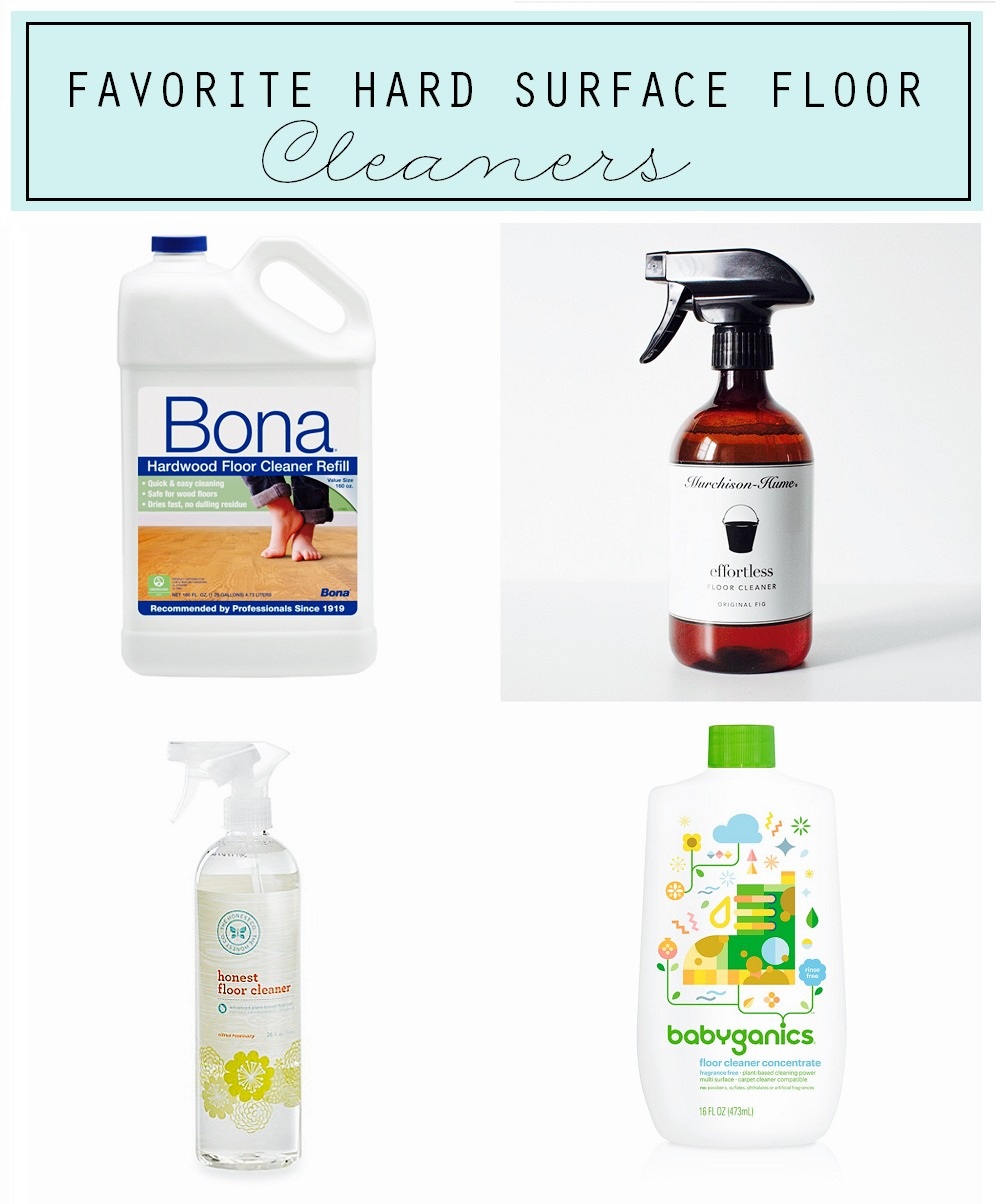
When it comes to just what brand or formulation of floor cleaner I prefer, I like to give a range of options and solutions. Some people love making their own cleaners while others prefer the pre-mixed, ready to go options.  I only recommend products that are non-toxic and safe to use around people and pets, but these are all products that I use and love.
 
Favorite-Hard-Surface-Floor-Cleaners-via-Clean-Mama-1
 
If you are looking for the most economical and green choice, then making your own cleaner is the way to go. Here is my tried and true recipe:
 
Ingredients:
  • 1/2 cup white vinegar
  • 1 gallon of warm water
  • 2-3 drops essential oils (I love lemon or lemon and clove for my hardwood floors)

I mix this up using the same ratio in my refillable floor mop:
  • 3 teaspoons white vinegar
  • 16 ounces of warm water
  • 1-2 drops e ssential oils (I love lemon or lemon and clove for my hardwood floors

If you prefer the convenience of pre-made cleaners, there are many options to choose from. My favorite brands for performance and safe ingredients are Murchinson-Hume, Bona, and Honest. All of these are ready to use – simply use the spray and mop method or pour into your refillable mop and clean away. Babyganics also makes a great floor cleaner concentrate that is unscented and easy to dilute – you can use it in a bucket and a refillable spray mop and it’s even compatible with carpet cleaners (see the links below).  If you like a mop and bucket for washing floors (not my preference), you might like a spin mop.  The one that’s pictured in the main photo is this one.

LAMINATE FLOORS:

 
One of the biggest complaints I hear about laminate floor cleaners is that all the commercial cleaners leave behind a sticky residue that attracts dirt and dust. My all time favorite laminate floor cleaner is a simple DIY cleaner using every day ingredients. Try out this recipe for an effective, economical solution to cleaning your laminate floors. 
 
Again, I prefer using a refillable mop for ease, but this solution can be mixed up and put into a spray bottle as well.  The vinegar cleans and the rubbing alcohol aids in the drying and adds a sanitizing component.  The combination is great for getting those floors perfectly clean.  Laminate and water are not a good combination so you’ll want to use this in a spray format in lieu of a mop and bucket.
 
Mix equal parts of:
  • white vinegar
  • rubbing alcohol
  • water
 
I like to add several drops of peppermint essential oil for a invigorating and fresh scent. I mix up five ounces of each of three ingredients with 3-5 drops of essential oil to fill an average size spray bottle or to pour into a refillable mop.
 

DEEP CLEANING TILE AND GROUT:

 
It doesn’t take long before grout in between tile can show dirt and wear especially when it is in high traffic zones like kitchens, entryways and mudrooms. There are several different approaches that you can take to deep clean both your tile and grout. A favorite tried and true method that takes a little more elbow grease is a combination of cream of tartar and water. Mix up a paste using these two ingredients that is the consistency of runny toothpaste. 
 
Using an old toothbrush or a thin grout brush, dip the brush in and scrub away at the grout. The cream of tartar is a natural ‘bleach’ that should help lift the stains out gently but effectively. Check your local dollar store for an inexpensive container rather than paying full price for a little one at the grocery store.

 
For effective tile and grout cleaning, I love using my portable steam cleaner. Home right makes a great model that comes with a lot of attachments so you can use the machine for more than just tile. The small nozzle attachment combines with the power of steam cleaning works wonderfully on tile and grout especially.

Thursday, 14 April 2016

An Ultimate guide to Mold Removal

As the weather is to get much colder in the new year it is time to start putting in place a few small measures to protect your home. One of the biggest problems facing people in their homes is Mold. Humidity, dampness, leaks and condensation in the right conditions can cause mold to grow almost anywhere.

ServiceMaster’s capacity for commercial flood and water damage cleaning and drying projects:

When considering the mold remediation needs of your property, partner with ServiceMaster and make restoration a part of your business plan. This can make all the difference in how fast you are back in business; call Service Master by Best in Wichita 24 hours a day. The quicker you call us, the faster we respond. Call: (316) 413-5750.
Here’s a quick run-down of how to remove mold from some common household surfaces and everyday items. Just another great home improvement tip.